Thursday, June 29, 2017

Foamiran Lilac


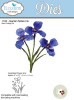
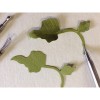
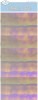
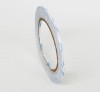
Today I have a card I designed using Foamiran to create a lilac  I used white Foamiran and colored a strip of it using  PanPastels.  I used two shades of purple PanPastels to give the petals some dimension. You can use a dark purple and sponge some white over it to achieve a light purple.  The PanPastels blend very well   The small flowers were die cut,  heated then attached to a branch created with card stock. The die I used is old and no longer available.  Two branches were die cut and a floral wire attached over the top of one branch, using  Clear Double Sided Adhesive.  The same adhesive was attached to the back of the second branch and attached over the wired branch.  This gave the card stock branch more stability and could be shaped (bent) because of the wire inside it.  The leaves for the lilac were colored using two shades of green PanPastels and dark red PanPastel. 

The framed background for the lilac was die cut using Dotted Scallop Ovals and Stitched Ovals.  The butterflies were die cut using the Dancing Butterfly die set. 


Tuesday, June 27, 2017

Foamiran Poinsettia


I know it is early to start Christmas cards, but I like to get an early start!  Today I used Susan's Garden Notes Poinsettia die set and and Foamiran to create this pretty flower.  I die cut the petals and shaded the red foamiran using Susan's Dark Red PanPastel, which is in Set 3.  The leaves were colored with a dark green PanPastel and blended with green in Susan's Set 1.  A little red was also added.  PanPastels blend so easily, and are my very favorite way to color Foamiran.  NOTE:  In the photos the Poinsettia leaves do not look very green, but they do in real life! The bracts (center of the poinsettia) were created with dots of Bottle Green and English Mustard Nuvo Crystal Dots.

Under the Poinsettia, Boughs from Susan's  Garden Notes Whitepine Boughs & Pinecone die set were added.  I used two large and two small boughs.

The frame for the poinsettia was die cut using Els van de Burgt Studio Dotted Scallop Ovals.  

The sentiment was die cut using the A Way With Word - Peace die set.

Gold Peel Off Sticker - Corner/Line Stickers were used to outline the design paper edge.  Left over "dots" from a Peel Off Sticker sheet was used to go around the flower.

It is never too early to get started working on Christmas cards.  The holidays always seem to come so fast.   

Thanks for stopping by today.  Links to the products used are listed below.


Monday, June 26, 2017

Happiness


Happiness is being in the flower garden chasing dragonflies or butterflies!  I have designed a card using the cute Krista Schneider Purr Clear Stamp Set. 

Using the Purr Clear Stamp Set, stamp the cat using VersaFine Black Ink on a piece of Watercolor paper.  Clear Emboss.  Use markers of your choice to color the images.

Use the Joset Designs Dream Sentiments Clear Stamp Set and stamp 'happiness', using VersaFine Black Ink  above the cat image; clear emboss.

Use the Els van de Burgt Studio Fitted Frames Rectangle die set to die cut the stamped images (this is the die in the middle of the set).   Leave the die cut in the die.  You are going to add color to the rectangle, leaving a small white border.

Use Susan's Earth & Sky Stencil and PanPastels to sponge blue on the upper third of this rectangle.   Sponge brown or green PanPastel to lower portion, to ground the cat.  Use a marker to add sprigs of grass around the bottom.

Use the Dotted Scallop Rectangle (second largest) die and die cut a blue rectangle to frame the stamped image.

Use the Leafy Branch 5 die set and die cut two green branches.  Use Susan's Leaf Tool to draw a line down center of each leaf, for dimension.

Use Susan's Garden Notes Cosmos die set to create two white Cosmos.  Shade the center of the flower petals with yellow PanPastels.  YouTube Video to Cosmos assembly at this LINK.

Attach a piece of design paper of choice to the front of a 6-inch card.  Attach the stamped image and arrange flowers on the left side of the rectangle.

Wouldn't this card be Purr-fect for anyone, especially someone who loves cat!


Friday, June 23, 2017

Second Foamiran Rose


I have created my second rose using Foamiran.  This material shapes beautifully when creating flowers.  The Foamiran I used was purchased from ScrapandCraft.

You can use any of Susan's Garden Club flower die sets to create beautiful flowers using the Foamiran.  I have always liked to die cut Susan's flower petals using white -- whether it is card stock or Foamiran.  I have tried many different products to color the flower petals and leaves, and by far, I LOVE to use Susan's PanPastels.  They are so easy to blend and always give me perfect results.  Pictured below are the three sets available from Elizabeth Craft Designs.
Susan's Garden PanPastel Flower Coloring Kit 1 (10 colors) - Die - ElizabethCraftDesigns.com

Susan's Garden PanPastel Flower Coloring Kit 2 (7 pcs.) - Die - ElizabethCraftDesigns.com
Susan's Garden PanPastel Flower Coloring Kit 3 (10 colors) - Die - ElizabethCraftDesigns.com
This is a 6-inch card.  Choose a piece of design paper of your choice for the background.  Use the Els van de Burgt Studio Entwinded Circles, Dotted Scallop Ovals and Fitted Ovals die sets to create the frame for the rose.  The little flourishes and tiny flowers on the Entwined Circles are discards from the ModaScrap Flower Lace 2 die cut.  The sentiment was die cut using the Love Sentiments die set.


Below I have I linked a couple different Susan's Garden Club die sets you can use to create beautiful flowers such as this rose.  

Thank you for stopping by today.  Happy Crafting!


Wednesday, June 21, 2017

Lilies


Don't you love all the beautiful flowers you can create with Susan's Garden Note flower dies!   There is  a Lily 2 die set in Susan's new release, which I have used to design this card.  These flowers are so easy to die cut and assemble.

 Create three lily flowers using the Lily 2 die set.  To create a realistic look, use a marker to draw a line down the center of each petal and little short lines on each side.  Shape the flowers with Susan's Flower Tool Kit and glue petals together using the Kids Choice Glue.  Die cut stems and leaves, shape and attach the flowers.  You can add pollen to the ends of each stamen.

Use a 5 1/2 inch piece of Soft Finish White Cardstock for the top of the card.  Use the Circles die set to die cut the image across the center of the card stock, as shown above.  Poke out the center of each circle and discard these pieces.  Use a Scoreboard to score around the outside edges of this piece, for a finished look.  Use the Scoreboard to draw five lines down from the top right corner as shown in picture.

Use another piece of 5 1/2 inch white card stock and attach a piece of Clear Double Sided Adhesive to cover one side.

Attach the negative of the Circles Background over the Adhesive, matching outside edges.

Attach the die cut Circles inside the opening of the negative die cut background. You will now have adhesive inside all the circles.  Try not to touch any of the adhesive with your fingers.   Place the protective sheet from the Adhesive over the die cut Circles and rub hard over the die cut to make sure it is attached well.

Use your glitter tray and Diva Silk Finish Microfine Glitter to cover the adhesive inside the circles die cut.  Be sure to use your fingers to rub over the glitter to bring out the sparkle.

Use the ModaScrap Dragonfly die set to die cut one Dragonfly.  Use a small piece of white card stock that has Clear Double Sided Adhesive on the top so you can add Dive Microfine Glitter to it.

Use the Holidays Garland 2 die set to die cut the border on the bottom of the card.  Use Silver Metallic Shimmer Sheetz that you add a piece of Clear Double Sided Adhesive on the backside.  If you add the Double Sided Adhesive to the back of the Shimmer Sheetz before die cutting, it will be easier to attach the die cut to the card.  Add white flat back pearls in between each of the loops in the border.

Add the Lilies, Dragonfly and Border as shown.

Susan's flower die sets are so easy to create beautiful flowers that will wow anyone who receives your cards.


Tuesday, June 20, 2017

Design Team Color Challenge


It is time for a new challenge for the Elizabeth Crafts Color Design Team.  This month we were challenged to create three Clean and Simple Cards using one die set plus a sentiment.  I chose to use the Krista Schneider Dreamers Clear Stamp Set along with the Dreamers Sentiment Clear Stamp Set.  

You can see all the projects designed by the Color Design Team at this LINK.

For today's challenge, Elizabeth Craft Designs is giving away a Krista Schneider Jungle Cuties Clear Stamp set with coordinating dies; a pack of Dusky Lavender Soft Finish Cardstock and a pack of White 100lb 8.5" x 11" Soft Finish Cardstock to 3 winners. 


To enter simply leave a comment on the Elizabeth Craft Designs Challenge post  and  -- "Describe your crafting style

Elizabeth Craft Designs will select 3 lucky winners in a random drawing 

The winners will be announced on Friday, June 23 on the Elizabeth Craft Designs blog.


Dreamers Clear Stamps - Stamps - ElizabethCraftDesigns.com

Dreamers - Die - Die - ElizabethCraftDesigns.com

Dream Sentiments Clear Stamps - Stamps - ElizabethCraftDesigns.com

The above shows the Dreamers Clear Stamp Set and the matching die set used to create these cards.  The Dream Sentiments Clear Stamp Set was also used.

This is a 6 inch square card.  Cut a piece of Soft Finish White Cardstock 5 1/2 inches square.  Use a scoreboard and score around the edges.  Attach to the front of the card.

To create frames for the stamped images, use the Fitted Squares and Dotted Scallop Squares die sets.  Attach the Fitted Square over the colored Dotted Scallop Square.

Stamp all the images to be used on White Soft Finish Cardstock and color with markers.  Die cut using the matching dies.

Use the Dotted Scallop Ovals to create frames for the Sentiments.  Stamp the sentiments on the smaller oval and attach the small die cut image on the smaller Oval.  Attach the small oval over the larger oval, using dimensional tape.  Attach the finished oval at the top of the Scalloped Square.

Sponge a little color, close to the bottom of the card, where the animal die cut image will be attached.  Attach the die cut animal over the sponged color.  Use a fine tip black marker to add a few black dots.

Three cute cards created with one stamp set and one sentiment set!

Be sure to leave your comment on the Elizabeth Craft Designs blog for a chance to win this Prize Package.  Good Luck!


Friday, June 16, 2017

Peach Dahlia

It always makes me happy to create a beautiful flower with Susan's Garden Flower Dies.  One of the new die sets is the Garden Notes Dahlia.  There are so many different colors of Dahlias which makes it fun to create a garden full of them.  I created many different colors, but this one I think, is my favorite.  It was die cut using Soft Finish White Cardstock then sponged with light pink PanPastel.  Next yellow PanPastel was sponged at the base of the petals, then hot pink PanPastel sponged on the tip of each petal.  I love the color combination.  The flowers were shaped using Susan's Flower Tool Kit.

A piece of Graphic 45 design paper was used for the background.  Three of the Els van de Burgt Studio Oval die sets were used to create the frame for the Dahlia -- Fitted Ovals, Dotted Scallop Ovals, and Entwined Ovals.    A few sticky back pearls were added to complete the card.


What is your favorite color of Dahlia?

Links to the products used a below.  Thanks for visiting today.


Thursday, June 15, 2017

Foamiran Rose


It is always fun to try something new!  My friend Joan told me about a new material to use for creating flowers called Foamiran.  I decided to purchase the Foamiran, which you have to order from Ireland.  There are a lot of YouTube Videos to learn techniques for this product.  I found it easy to create my flower using Susan's Garden Club Products from Elizabeth Craft Designs to create my first Foamiran flower.  

The Foamiran is very thin and die cuts easily using Susan's Garden Note Flower dies.  In fact, you can die cut four layers at one time.  One of my favorite flowers to create with Susan's die sets is her rose, so for my first Foamiran flower, I used Susan's Garden Rose 1 die set.


To color the Foamiran, I used Susan's PanPastels.  They blended beautifully to color the petals.  For this rose, I used the bright pink PanPastel.


Susan's Flower Tool Kit is perfect for shaping the Foamiran.  In this picture you can see how I drew the lines on the Rose leaves.


To color the leaves, I used two shades of green PanPastels.  

To shape the flowers, you need to heat the Foamiran petal/leaf and then you can shape it on Susan's Molding Pad with the tools in her Flower Tool Kit.  You press down with one of the stylus and it stretches the Foamiran.

For the background I used one of the ModaScrap Thinking About - Rio De Janerio card stock.  The Oval Frames were created by using the Dotted Scallop Ovals.  To create the opening in the white oval, I offset one of the Fitted Scallop dies on the Dotted Scallop Oval, and die cut.  This created a wider white frame on the upper portion of the oval.  

One of the Dancing Butterflies was die cut using Soft Finish White Cardstock.  

The leaves behind the rose were die cut using the ModaScrap Pair of Leaves 1 die set.  

The Thanks sentiment is one the Els van de Burgt Studio Sentiment dies.

I love using Susan's Garden Note flower dies to create my flowers with card stock, but it was fun to learn other materials can also be used.

Links to the products from  Elizabeth Craft Designs are below.  


Tuesday, June 13, 2017

Graduation Card


It is graduation time!  One of my grandsons is graduating from high school this year and I needed to make him a card.  All the products used are from Elizabeth Craft Designs.

Two Stitched Fishtail Banners were die cut -- one in Soft Finish White Cardstock and one in Metallic Red Shimmer Sheets.  They were attached together using dimensional tape.

The year was die cut using the Numbers and More die set and Gold Metallic Shimmer Sheetz.

The stars were die cut using one of the dies from the Joset Designs Hot Air Balloon die set, and Red and Gold Metallic Shimmer Sheetz.

The Congratulations was die cut using the A Way With Words Congratulations die set and Gold Metallic Shimmer Sheetz.

I used a discontinued upper case alphabet set from Elizabeth Craft Designs for my grandson's name.  You can purchase Upper Case Alphabet Peel Off Stickers, which are linked below.

To create the graduation cap, the Els van de Burgt Studio Fitted Squares die set was used for the top of the cap.  It was die cut using Red Metallic Shimmer Sheetz A hole was punched in the center and thin gold cording was attached in between the prongs of a brad, then pushed through the punched hole.   To elevate the cap, two layers of Fun Foam were also die cut, with the same small Fitted Square die. All the pieces were attached together using Clear Double Sided Adhesive strips. 

On the inside of the card I created a pocket for money, using one of the Stitched Rectangles die set.  


Friday, June 9, 2017

Alstroemeria Mirror

My daughter loves Alstroemeria and I wanted to make her a gift using these flowers.    I used Susan's new Garden Notes Alstroemeria dies to decorate this black mirror wall hanging, for her.  

The Alstroemeria were die cut using Soft Finish White Card Stock.  The flowers were colored using Susan's PanPastels, then shaped using her Flower Tool Kit.  

The ModaScrape Flower Lace 2 die set was used to die cut two Flower Laces using Soft Finish White Cardstock.  

The Alstroemeria were attached to the frame using glue dots.  The Flower Lace 2 pieces were cut in half an arranged under the edges of the flowers.  The Alstroemeria leaves were attached under the flowers.

Two different A Way With Words die sets were used for the sentiment - Amazing Beautiful and Thank You.  The Beautiful and You die cuts were attached to the frame with glue. 

I think my daughter will love receiving this frame.

Links to the products used are listed below.


Thursday, June 8, 2017

Hello


Have you seen the five new ModaScrap lacy dies? You can add an elegant flair to any card or project with these beautiful die sets.  Today I have used two Lace Corner die cuts to create a square frame for the sentiment.
  1.  Create a 6 inch square card, using Soft Finish White Cardstock.  To the front add a piece of design paper of your choice.
  2. Die cut two Lace Corners using Soft Finish Perfect Purple Cardstock.
  3. Use the  Dotted Scallop Square die that measures 4.5 inches, and die cut it from Soft Finish White Cardstock.
  4. Add a strip of 3mm Clear Double Sided Adhesive to the outside edges of the purple lace corners and attach in the center of the Dotted Scallop Square, creating a square with the corners.  Attach this square to the center of the card front, using dimensional tape.
  5. Use Susan's Garden Notes Iris die set to create two Iris.  Shape the flowers using the Flower Tool Kit.  YouTube Video for assemble at this LINK.  Attach the flowers to the lower left corner of the card.
  6. Use the Dragonfly die set and die cut two dragonflies.  Die cut one using Australian Opal Shimmer Sheets and the other using Turquoise Gemstone Shimmer Sheetz.  Attach the bodies of the Turquoise dragonfly on top of the lighter dragonfly and separate wings on each side.  Attach the dragonfly on the upper right corner.
Be sure to check out all the new ModaScrap die sets to create beautiful cards.


LinkWithin

Related Posts with Thumbnails