Thursday, October 31, 2013

Susan's Garden Poinsettias


 I am excited to show you my new project created using the new Sizzix, Susan's Garden "Poinsettia" flower dies.  I do own a lot of different poinsettia dies, but this by far is my favorite because you can create very realistic poinsettias in different sizes.  It all depends on which poinsettia petal die cuts you decide to use.  You can make large poinsettias for arrangements like the one on this lantern, beautiful poinsettias for gift packages, any size poinsettias for greeting cards, etc.  You can use different things to create your flowers such as 60# or 80# card stock, watercolor paper, vellum, glitter paper, etc. The ideas are endless.  I'm sure you will love working with Susan's Garden poinsettia dies.

This picture shows seven different sizes.

 This picture shows the six different petals in the Susan's Garden Poinsettia plus the calyx (base).  

 Inside each flower package, Susan has instructions on how to create the flower plus very soon her videos will be online to give you more information.  I wanted to show you how I make the petals realistic.  I am using the Susan's Garden Flower Tool Kit.  It has special tools for creating the shapes needed.  The first leaf on the upper left is just die cut; second leaf shows line drawn down the center, on the back, using the leaf tool and leaf pad.  This pad allows you to get a nice drawn line on your petals when using the leaf tool.  Next I fold the leaf in half (bottom sides together) and crease down the scored line with my finger nails.  This gives that center seam extra dimension to define that center vein.  Next open the leaf, and on the front, draw the side veins with the leaf tool.  You can further shape the petals/leaves by using the self-closing tweezers that are included in the tool kit.

For this tutorial, I am creating the small pink poinsettias.  After the petals were shaped, I applied the light pink Susan's Garden Pan Pastels down the center with the pointed tool.


The two small pink poinsettias are different sizes and to accomplished this I used the calyx from the poinsettia die set for one, using the two smallest petals in the "poinsettia" die set, and the calyx from the Susan's Garden "Mini Petals" for the smallest one using the smallest petals. 

 Susan has great instructions in the package for creating the poinsettias, but I changed it a little for these very small flowers.  I started by adding 3 petals.

Then added three more petals in between the first three.  You can then add as many of the smallest petals as you want to make it as full as you like.

Are are the two small poinsettias completed.

 This poinsettia was created with "The Paper Studio" Glitter card stock.

 This poinsettia was die cut using white card stock.  It was sponged with plum ink then mauve glitter added.

This poinsettia was die cut using red card stock, red and orange Pan Pastels added to middle vein of each petal, then black sponged around the edge of each petal to help define each petal once the flower was assembled.

I have created all the flowers in the new Susan's Garden Collection and will be posting each one individually and doing tutorials as needed.   You can see all the new products in the Susan's Garden Collection at this link.

Products used  available from Ellen Hutson, LLC:
Susan's Garden "Poinsettia" dies
Susan's Garden "Flower Tool Kit"
Susan's Garden "Pan Pastels"
Susan's Garden "Mini Petals"
Susan's Garden new flower collection

1049180

Tuesday, October 29, 2013

Heartfelt Creations Card and Pumpkin Tutorial


 This is the second post today.  The Heartfelt Creations Blog Hop is one post down.

 Today I have a Heartfelt Creations card and some little pumpkins I designed using the new Sweet Juliet Collection.  Below is a tutorial on how I created the pumpkins with the Sweet Juliet dies.

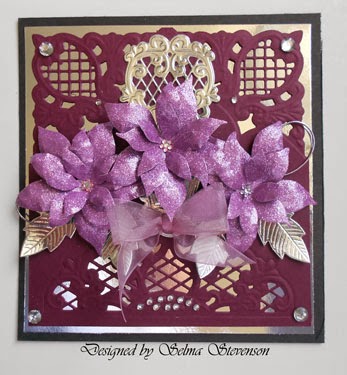
To create this card, I used a frame from the Heartfelt Creations "Antiquity Paper Collection" for the background.  In the center I stamped the sentiment from the "Blessing To Me PreCut Set", using Brown VersaFine Ink.  The leaves in the sentiment were colored with a Copic marker.  In the upper corner I created the flowers with the Heartfelt Creations "Sweet Juliet Dies".  Aren't these creative flowers! The larger petals, on each flower,  were die cut using  brown card stock and the small petals were die cut using black card stock.  I wanted some texture on the brown petals so used the leaf stamp in the "Blessing to Me" stamp set and stamped one end of the leaves, in black, over the petals.  The flower was then assembled using a large black brad in the center.   Emma Lou, the creative director at Heartfelt Creations has a video showing how to assemble these flowers.  The leaves behind the flowers are also from the "Blessings To Me" stamp set.

TUTORIAL FOR CREATING PUMPKINS

 When I was assembling the flowers for this card, I used a stylus to shape each petal and when they were curled up, I got an idea that maybe I could create a pumpkin.  I love how these pumpkins turned out.


The Sweet Juliet Dies were intended to be used to create flowers.  I used two die cuts of the same size for each pumpkin.  I used a small brad to assemble them.


 To assemble the pumpkin, I began by gluing the two pieces together at the center.  This would become the bottom of the pumpkin.

 Next, I used the stylus to shape each "leg" starting just below the end and going to center.  This was done on each "leg".  See how they curl up. 

 When you get all the "legs" shaped, it will look like this. Doesn't look much like a pumpkin here, does it!

 I used a brad, with the head on the inside, and started pulling each "leg" up over the prongs of the brad.  In this picture I used a much larger brad because it was easier to use for this tutorial.  I actually used a small brad.  You can see how the "legs" of this die cut are being layered.  I went all the way around adding each piece, making sure not to skip any.

 Once they were all on the brad, I pushed down on the ends of the brad to hold it in place.  Again, I did not use this large of a brad.  If you do use a large brad, it tends to make the pumpkin fall over.  You can shape your pumpkin by pressing down on the center top.  In this picture you can see some of the pieces are kind of pushed in, just use your fingers or a stylus to pull them out so the are shaped nicely.


To make the top look like a pumpkin, I glued on a piece of twig and added on some die cut ivy. 

I always love to find different ways to use my dies, and this ended up being a fun project.  Hope you give it a try!

You can see the Heartfelt Creations stamps, dies, and design paper in the  "Sweet Juliet Collection" here.

Products used:


Heartfelt Creations Alumni Design Team Blog Hop


It is time for the Heartfelt Creations Alumni Design Team's Blog Hop.  There are ten designers participating this month and we hope to give you a lot of inspiration using your Heartfelt Creations stamps, dies, and design paper.  If you would like a chance to win a $25 gift certificate to Heartfelt Creations, all you have to do is leave a comment on each designers blog hop post.  One winner will be selected and announced on Saturday, November 2.

Here are the designers participating this month:

Selma Stevenson (you are here)
Some of my favorite older Heartfelt Creations stamps were the Christmas Cardinals with matching dies.  I designed the card using a Sizzix embossing folder for the background then punched out snowflakes using silver glittery card stock to create a wreath and a few falling snowflakes.  Both sentiments are from Heartfelt Creations.  A red bow was added to complete the card.

Be sure to leave a comment below then visit the other 9 blogs and leave a comment for a chance to win a $25 gift certificate to Heartfelt Creations.

 Product List:

Heartfelt Creations, Cardinal Family PreCut Set, HCPC 3353
Heartfelt Creations, Cardinal Family Dies, HCD 706
Heartfelt Creations, Let It Snow Flurries PreCut set, HCPC 3343
Sizzix, Snow & Trees Embossing Folder, 658197
Martha Stewart, Artic Snowflake and Aspen Snowflake Border punches

1047690

Monday, October 28, 2013

Susan's Garden New Flower Dies


Here they are -- all the beautiful flowers you can create with the new Sizzix, Susan's Garden Flower dies.

I LOVE my new "Paper Garden".  I have had so much fun creating each one of these gorgeous flowers.  It is amazing that Susan Tierney-Cockburn could design such intricate looking flowers into dies that are so fun and easy to assemble. I know you will be thrilled with each one you create, and your friends are going to find it hard to believe you could create such beautiful flowers out of card stock.  These flowers will be gorgeous on cards, boxes, home decor pieces, etc.

In case it is hard to read, here are the names of the 15 new flowers starting from the upper left corner:  Anthurium, Bougainvillea, Calla Lily, Cattleya (orchid), Clivia, Columbine, Fuchsia, Dahlia, Gazania, Hardy Geranium, Helleborus, Narcissus, Pulmeria, Poinsettia, and Yarrow.

Susan completed videos, for each flower, that soon will be released by Sizzix. Since these videos are not out yet,  I just followed the directions inside each package, and had very little difficulty creating them.  Also, soon I will start posting pictures of each individual flower and giving little mini tutorials, on things I "did" or "discovered" that might be of additional help.  I'm looking forward to helping you create your flowers using Susan's Garden Flower dies.

You can purchase all the Susan's Garden flower dies and products from Ellen Hutson, LLC.

Thank you for all your comments on my bird cage post.  I love to read your comments.

1047290

Saturday, October 26, 2013

Susan's Garden Gorgeous Flowers


I am very excited to announce that I am now designing for Susan's Garden and will be working with Susan Tierney-Cockburn. I love her line of products. 

My first love (in crafting) has always been working with flowers.  I started designing flowers with Susan's Punch Bunch punches and learned her techniques by following instructions in her "Paper Bouquet" book. There are so many ways to use these dimensional flowers. You always get oohs and awes when you create these beautiful flowers.   

Last May, the first 16 Susan's Garden dies were released through Sizzix and very soon, 15 additional flowers will be available.  In order to create beautiful flowers with her dies, Susan also designed a Flower Tool Kit and Plastic Flower Pots, available through Sizzix.   Other products Susan has are Pan Pastels which include a tray of ten colors, The Susan's Garden Viva "Paper Pen" collection, and Woodland Scenics "Pollen" for creating stamens, and the Susan's Garden "Ladybug" kit. 

I received my new collection of Susan's Garden Flower Dies and many were used in the birdcage. I created "Fall" flowers from both collections.  Can you tell which ones are from the first collection and which ones are new?  From the first collection I used the Susan's Garden "Sunflower", "Blackeyed Susan", and "Mini Petals."  From the new collection I used the "Gazania", "Dahlia", and "Yarrow" dies.


Here is a closeup of the flowers.

 I have been busy creating flowers in the rest of the collection.  Very soon I will be posting individual flower pictures with instructions.  

I am excited to have this new Susan's Garden flower collection and I am sure you will too.  

1046176

Thursday, October 17, 2013

Our Friendship is Priceless


Today I have a card designed using  Cheery Lynn dies and JustRite stamps.  This is a 6x6" card.   Along the left side of the card is a piece of trim that has a gunny sack type base with a piece of lace overlay, purchased from Michaels.  The bird cage was sponged on using the Crafters Workshop "Mini Birds of a Freather" template.  I only used one of the bird cages on this template.  The roses were created using the Cheery Lynn Large and Miniature Rose dies.  They were shaped using the Susan's Garden Flower Tool Kit.  The card stock was a very light tan and a very light peach ink was sponged on the base of each petal.  The leaves were die cut using the Cheery Lynn "Flourish Leaf Strip".  The sentiment is from the JustRite "Vintage Oval Labels" stamp set, and the little butterflies are from the JustRite "Fleur De Lis Labels Twenty" stamp set.  Mahogany Distress Ink was used for all sponging.

Thanks for visiting my blog today.

 Products used are:
JustRite, Vintage Oval Labels, CL-02100
JustRite, Fleur De Lis Labels Twenty
Cheery Lynn, Large Rose, B155
Cheery Lynn, Minature Rose, B152
Cheery Lynn, Flourish Leaf Strip, B178
Susan's Garden Flower Tool Kit by Sizzix
The Crafter's Workshop, Mini Birds of A Feather, template, TCW207s

1040949


Wednesday, October 16, 2013

Congratulatiions


It is time for some more Heartfelt Creations inspiration! I love how easy Heartfelt Creations has made it for us to create quick and easy cards.  I used one of the 6x6 squares out of the "Antiquity Paper Collection for the frame on this card.  It looks like there are six layers plus the black backing I added.  They make it so easy to create a card that looks like it has many layers.

In the center, I used one of the stamps from the "Juliet Spray PreCut Set" to stamp in the middle, blank center, of this frame.  On the bottom I used one of the flower stamps from the "Tattered Blossoms PreCut Set" to create a double layered flower. They were die cut using the "Tattered Blossoms Die". Behind the flowers I stamped the greenery from the "Blessing to Me PreCut Set" three times and cut them out with scissors.  Everything was colored using Spectrum Noir markers.  In the center of the flowers I added a Kaiser Craft "Daffodil Sparklets" from Heartfelt Creations.   

For a lot more inspiration, be sure to go over to the Heartfelt Creations blog to see all the new, beautiful cards posted today using the "Sweet Juliet" Collection.   

Products used:

Antiquity Paper Collection, HCDP1 237
Heartfelt Creations, Juliet Spray PreCut Set, HCPC 3567
Heartfelt Creations, Blessings to Me PreCut Set, HCPC 3564
Heartfelt Creations, Tattered Blossoms PreCut Set, HCPC 3468
Heartfelt Creations, Tattered Blossoms die set

1040316

Sunday, October 13, 2013

Post Card

Isn't this a beautiful stamp!  It is from the Heartfelt Creations "Sweet Juliet" Collection.   I usually like to add dimensional flowers to my cards but this stamp is so beautiful I did want to cover any part of it.  This stamp is from the "Post Card PreCut Set".  It was gold embossed on ivory card stock.  I used Copic markers to color the flowers and leaves then sponged on Scattered Straw and Tea Dye Distress Inks over the whole thing.  The edges were distressed.  The writing on the post card has many different friendship sentiments, so will be perfect to send to a friend. 

For the background I used the Brenda Walton "Trellis" embossing folder on the top half and a piece of design paper from the Heartfelt Creations "Sun Kissed" Collection on the bottom half.  The Heartfelt Creations "Decorative Blossom Corner" was attached at the top then the stamped imaged placed over it.  Dew Drops were added across the top and on each corner of the stamped image then a bow placed in the lower corner to finish the card. 

Products used:
Heartfelt Creations "Decorative Blossom Corner", HCD729
Heartfelt Creations "Sun Kissed Paper Collection"
Brenda Walton, Trellis embossing folder, 658356
Ranger Detail Gold embossing Powder

1038539

Thursday, October 10, 2013

Wood and Sparkle

 Today I have a card that has a wood look background that I created using my ScorPal and a variety of brown shades of Distress Inks.  I started with a piece of ivory 6x6" card stock and scored it every 3/4" across, to resemble seams in a piece of wood paneling.  I then placed the piece on a foam pad and added some squiggle lines,using a stylus,  for some distressing in each panel.  I pulled out all the shades of tan and brown Tim Holtz Distress Ink pads and started sponging on color, starting with the lightest color, until I was happy that it resembled wood. 


 Here is a little closer view and I think you can see the lines drawn in the card stock.  I wanted to create a Fall theme card.  I used the Marianne Design LR0128 flower die for the flowers,  and created stamens using the Cheery Lynn Build A Flower dies.  The flowers were die cut using burgundy card stock then using a sponge, I added Viva 3D Stamp-Paint for a beautiful sparkly shine.  The large leaf was die cut using the MFT, Hibiscus, die.  It was die cut using dark tan card stock and then sponged with , Viva Moss Green Metallic, Copper and Carmine Red-metallic 3-D Stamp-Paint.  These paints blend together really well for beautiful results. I purchased these paints from Heartfelt Creations. Emma Lou has a Heartfelt Creations video showing how to use these paints, on their blog under Tutorials.

Here is a close up so you can see how well the 3-D Stamp-Paint blended on the leaf.  Under the flowers I added a piece of multi-colored mesh that has some metallic gold in it.  I bought a roll of this several years ago at Michaels.  I also added three Marianne Design embellishments (LR0192) behind the flowers that also have the 3-D paint on them.  A little burgundy cording is under the flowers.

 For the sentiment on this card, I used an old JustRite stamp set called "Autumn Blessings".  It was die cut using a Spellbinders Oval Nestability then sponged.  I used the Tim Holtz punch to add holes around the die cut frame.  Three leaves and a butterfly were added to complete the card.

I have had a lot of emails asking about my daughter.  She just had her first doctor's appointment since surgery, and was told she is progressing well.  She had no damaging effects that were a possibility, so we are very thankful.  She will not be able to move her head much, and can not lift any thing until after she starts physical therapy in four weeks.  She is not able to tilt her head down to write or get on her computer,  so asked me to thank all of you that sent her cards.  She was so thrilled. They are on display in her home.   We thank you for all your thoughts, prayers and beautiful cards.   

Products used on this card:
ScorPal
Distress Inks
JustRite, Autumn Blessings Stamp Set
Marianne Design flower, LR0128
Marianne Design embellishment, LR0192
MFT, Hibiscus die
Cheery Lynn, Build A Flower Embellishments
Viva, 3D Stamp-Paint, Moss Green-Metallic, Copper, and Carmine Red-Metallic

1036699

Wednesday, October 9, 2013

Love is like a Butterfly

 I have a new technique I tried today that I thought I would share with you.  To create the background for this card I used the largest Spellbinders "Exquisite Circles" die to cut an opening in the front panel then inserted the die cut doily piece back inside the frame.  Here is how I did that.

 I started with a 5.75 x 5.75" piece of white card stock and placed the Exquisite Circle a little high, taped it in place, and die cut it.  Before removing the die, I used the Tim Holtz Blending Tool and sponged on Milled Lavender Distress Ink over all the part around the large circle then  sponged over the die and part way inside the die.  This left a really cool effect!

 Once I took the die off the card stock, this is what I had.  The two pieces each ended up with a white edge.  Love that look especially when made dimensional.


My base card is 6x6" square. I added dimensional tape all around the edges of the larger piece, and around the die cut area, and attached it to the base card.  For a lot of dimension, you might need to add a double layer of tape, depending on the thickness of the tape.   Next I used double sided tape on the back of the circle and placed in down inside the elevated outside piece.  You can see the dimension by looking at the top portion of the die cut circle in this picture.   

Next I added one of the Spellbinders "Moroccan Accents" in the center with dimensional tape.  The Memory Box Moon Light Butterfly and Kaleidoscope Butterfly were layered and it was also attached with a small piece of dimensional tape.  The Moonlight butterfly was also sponged with the Milled Lavender Distress Ink.

The pretty butterfly corner is the Cheery Lynn "Butterfly In" die and the upper corner die cuts are the Cheery Lynn "Lace Deco Corner".  The sentiment is from the JustRite "Winged Vintage Labels Two & Three" stamp set.

Products used:
Spellbinders, Exquisite Circles, S4-384
Spellbinders, Moroccan Accents, S5-064
Cheery Lynn, Lace Deco Corner, B162
JustRite, Winged Vintage Labels Two & Three, CR-04465
Cheery Lynn, Butterfly In, B205
Memory Box, Kaleidoscope Butterfly, 98261
Memory Box, Moonlight Butterfly, 98260

1036178

Tuesday, October 8, 2013

Heartfelt Creations Sweet Juliet Collection


 It is time for the new Heartfelt Creations October release of the "Sweet Juliet" Collection.   This collection is inspired by the beauty of ancient rooms locked away and laden with antique treasures. These rooms are filled with yellow candlelight and dusty vases. Crinkly letters lay scattered around, turning crisp and fading more every day. A postcard lays covered in thick dust, forgotten in a dark corner. Wildflowers lay around, as crisp and crinkled as the beautiful wallpapers. Using these detailed floral and typographical stamps, complemented by black, gold and burgundy papers will enable you to create an outstanding classical creation.


Heartfelt Creations makes it easier and easier for us to create beautiful cards that are quick to design.  I love how their design paper pads come with 12x12" paper, some pages that include four different 6x6" backgrounds that you can just cut apart, and many pages with frames and tags that make it easy to create any style of card or project you want.  Be sure to check out all the beautiful pages in the "Sweet Juliet" Paper Pad Collection.

I used one of the framed squares from the design paper for this card.  Look at all the layering and beautiful corners included in the design!   The center was left blank for you to add a sentiment or any stamped image.   I chose a stamp from the new "Recovery Wishes PreCut Set".  I love this stamp and know I will use it over and over.  

I stamped the floral image in the blank on this panel and colored it with Distress Markers. To color around the outside edge of the area, I placed some Post-it-Notes around the outside edge and sponged on two colors of Distress Ink.   To give it a little dimension, I glued on Flower Soft over the flowers.  The piece was added to a white 6x6 card and the edges were sponged with Distress Ink.  The sentiment at the bottom of the stamped image was cut from the Sweet Juliet design paper, backed with a piece of black card stock, and attached with dimensional tape.  A little Distress Ink was also sponged on it.  

Be sure to go over to the Heartfelt Creations Blog today to see all the beautiful cards created by the Design Team.


Monday, October 7, 2013

Purple Poinsettias

 Today I have a card for you that I used something I haven't tried before.  I used a piece of purple glitter card stock from a DCWV pad called Complementary Colors.  It die cut very easily. I love the look of the glitter paper to really make these flower "pop"!   I used the Poppy Stamps "Blooming Poinsettia" dies for the flowers and leaves.  The leaves were die cut using a piece of silver shiny card stock from this same pad.   In the center of the flowers I added rhinestones.

To create the background, I used the Marianne Design LR0200 corners and the die cut design on the bottom is the Marianne Design LR0269 die.   I have had questions before on how I die cut these corners.  This picture shows how  I have two corners and tape them down right along the edge.  The other die is placed a little above the bottom of the card stock and taped; this die does not cut along that bottom edge.  Run it through your die cutting machine then you will need to cut the outside edge off around the upper die cut corners.

 I placed a piece of shiny silver card stock behind the die cut background, to match the leaves. The color of the die cut background isn't showing up it's true color -- it matches the poinsettias very well in real life!  Also, I used the Marianne LR0265 die cut to place behind the poinsettias.  It is hard to see in the picture, but I also used some silver cording behind the flower,s then added a bow at the bottom of the arrangement.  Silver rhinestones were added to complete the card.

One more Christmas card completed!

1034514

LinkWithin

Related Posts with Thumbnails