Friday, September 30, 2011

Magenta Flower


Today's card is made with Cheery Lynn Dies.  The flower is made with the new "Stacker Flower #3" (SF-3).  I think it is such a pretty flower.  The stamen was created with the Punch Bunch "Sky Flake" punch.  The green flourishes were die cut using the Cheery Lynn "Tropical Flourish" (B127) die.  The two doilies under the flower were die cut using the Cheery Lynn "Scandinavian Hearts" (DL155) die.  There are two doilies in this set - the square doily and the little round one that is under the flower.  The design papers used are from the BoBunny "Garden Girl" collection.  A silk bow was added to complete the card.

All these products can be purchased from Joan's Gardens.


324888
-

Wednesday, September 28, 2011

Joan's Gardens Weekly Challenge #4


It is time for another challenge at Joan's Gardens.    Here is the challenge Joan gave us this week:
■ Create a Card using something from nature
■ Create a card using several layers
■ Create a card using glitter

■ Created a card using a border around the card

This is a 5 1/2" square card.  For the layers on my card I used the Martha Stewart "Doulbe Arches" border punches for the bottom layer. I started with a 6" square then punched around the edges and layered it on top of the white card.  On top of that is the Cheery Lynn Dainty Dutch Deco Frame (DL141).  This is the perfect size frame to layer on top of the Doulbe Arches punched border to give it an even more dainty look.  Behind the Dainty Dutch Deco Frame I have attached a piece of design paper from the Kaiser Craft "December 25th" paper pad.   The beautiful image is the Penny Black "Nature's Best" stamp.  It was colored using colored pencils and OMS.  I stamped just the bird a second time and attached it over the one in the design for additional dimension.  For the top I die cut the beautiful new snowflakes from Marianne Design (LR0123). There are three snowflakes in this set; they can be used separately, but I chose to layer them.  The three different flakes were attached with dimensional tape.  I wanted to add glitter,  so I used a new product you can get from Joan's Gardens called "Glue n' Seal".  Wow!  this glue is fabulous.  You can use it for many things such as when you paper piece, add paper to boxes, etc.  I used a brush and applied the glue all over the dimensional snowflake then poured glitter over it.  What an easy way to accomplish that.   Below is a picture of this glue. I still had some of the glue left on my brush so lightly brushed it over the holly around the bird and lightly sprinkled glitter on it. The sentiment is from the JustRite "A Merry Little Christmas".  It was gold embossed and placed slightly under the holly. 

Here is a picture of the Glue n' Seal I used to hold the glitter:


Please go over to Joan's Gardens to get all the details about this week's challenge.

323587

Tuesday, September 27, 2011

Heartfelt Creations Alumni Blog Hop and a Chance to Win a Heartfelt Creations Stamp Set


It is time for another Heartfelt Creations Alumni Blog Hop.   If you started from the beginning you came from Debbie Seyers blogThe next blog on this hop is Olga Jewel's blog.  Would you like to win the Heartflet Creations  "Posy Patch Garden Delights Pre Cut Set" (HCPC 3306)?   A winner will be randomly selected from comments left on all the blogs in this hop, through midnight Thursday the 29th! The winner will be announced on Saturday October 1st.  Be sure you leave a comment, on each blog, so you have a chance to win this pretty stamp set from Heartfelt Creations.

I LOVE the poinsettias from the newest Heartfelt Creations "Christmas Cheer" collection, so thought I would design a gold and off-white card using the "Petite Poinsettia PreCut Set (HCPC 3415). This is a 5 1/2" x 6" card.  The card is attached to a gold background.  The design paper is from the KaiserCraft "December 25th" paper pad.

There are four different size flowers in this set Poinsettia stamp set and I have used all of them.  The flowers were gold embossed on vellum card stock and three layers stacked together to create the dimensional flower. These poinsettias do have matching Spellbinder dies to make it easy to cut them out.   The arrangement on top is placed on a gold doily cut from Marianne Designs (LR0185).    The flourish below the flower is the Cheery Lynn "Lace Rose and Flourishes (B135). The border on the bottom was created by placing a piece of gold card stock across, then layering a die cut border using the Spellbinders "Classic Triple Scallop" die.  A piece of gold metallic trim was placed across the middle of this border.  In the upper corner two Spellbinders corners were cut using the "Lace Doily Accents".  All the pieces were arranged as shown, then gold "Dew Drops" added to the center of the flowers. 

Remember to leave a comment below on my blog for a chance to win the Heartfelt Creations stamp set.  You next stop will be to Olga's blog.

All your Heartfelt Creations stamps and dies, plus all other products I use, can be purchased from Joan's Gardens.

322060


Sunday, September 25, 2011

A Big BOO to You


Today I had fun playing with a new die cut Halloween die cut from Joan's Gardens.  Isn't that a great spider web!  This is one of the new Cheery Lynn doily dies "Spiderweb" (DL162).  Joan also has some other Halloween dies that are great.  I used an embossed mesh texture for the background then placed the die cut web on the left side.  I showed you some flowers I made with some of  the new Cheery Lynn  Window Stackers last week, and decided to use them on this card.  These flowers were created with the "Scalloped Window Stackers" (XMC-5).  Joan has a video on her blog showing how to do this.  I used the Marianne "Forest Branch" (LR0150) under these flowers.    The cute sentiment is from the JustRite "Trick or Treat Set".  The border was stamped on ivory card stock then cut around the frame with scissors.  The sentiment was stamped, black embossed, and cut out with a Spellbinder oval Nestie.  The edges were sponged before attaching it to the frame with dimensional tape.  Stickles was used on it to give it some shimmer.  I had a few Halloween embellishments by  that I rece"Making Memories"ived from Joan's Gardens last year.  I love the little spiders on the web.  The jack-o-lantern and bat are also part of those embellishments.

Here is a picture of the Window Stackers used to create these crepe paper flowers.  On the video, Mike cut pieces of crepe paper and stapled them together.  I found you can just use the width of the die and keep folding the crepe paper streamer over and over until you have 12 layers.  Press the ends down in a good fold and place the Stacker on top and run it through your die cutting machine.  You instantly have 12 layers of Stackers to create your flower. 

This beautiful Cheery Lynn Spider Web doily and other cute Hallween dies have been very popular and you can see them at Joan's Gardens.  She also has the JustRite Halloween stamps.


321603

Saturday, September 24, 2011

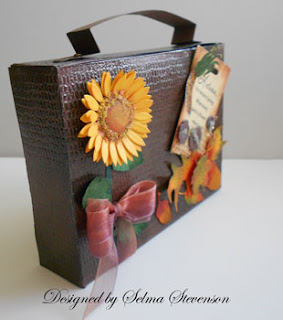
Autumn Leather Suitcase Box

My Leather Suitcase Box

Side view of suitcase

You can see the design on the ends of the handle in this picture.

This picture shows drawer open

I had so much fun creating this box.  Does it look like a leather suitcase?  All the dies, embossing plate and stamps can be purchased from Joan's Gardens.  I have used the Cheery Lynn "Burble Texture Embossing Plate" (E164) before, but from the time I first saw it, I thought it would be fun to create a box that looked like a leather suitcase using it.  Well I finally completed this project.  This is a box, with a drawer, that measures 6x9".   I used the Burble texture embossing plate to create texture all over the areas that show on the outside of this box.  What is great about using this texture plate, rather than an embossing folder, is that you can lay the texture plate over parts already embossed and it works out great.  I had to overlay the plate on the embossing in order for it to fit through the die cutting machine.  After all the pieces were embossed, it was distressed with Tim Holtz Distress ink then I patted the VersaMark pad all over it and covered it with clear embossing powder and heat set it.  Doesn't it look like leather.  I was thrilled with the way it turned out.  The box was taped together with ScorTape.  A handle was cut and each end die cut with a Spellbinder tag die.  The handle fit into the opening of the tag die so I could cut just one end at a time.  It was attached to the front of the drawer with an antique brad. 

To design the side of the "suitcase" a sunflower was die cut using the Cheery Lynn (CL) Sunflower (DL121).  There are three layers of the flower.  The tips of the petals were sponged using a darker ink to give depth to it.  The center was shaped with the tools from the Flower Tool Kit and sponged with different colors of yellow and brown inks.  Flower Soft was added around the edges.  The stem for the sunflower is just a thin strip of green card stock.  The leaves, Heartfelt Creations "Distressed Leaves PreCut Set" (HCPC 3376) were clear embossed on green card stock and sponged with a darker green.  They were cut out with the matching Spellbinders Nested Leaves Nestabilities.  

The sentiment is from the JustRite "A Day in the Country" stamp set.  It was stamped on the Marianne tag (LR0 188).  The edges were sponged with different colors of Distress Ink.  The three buttons also come with that tag die and were cut out of brown card stock then twine put through the button holes.  A small piece of wire mesh embellishment was placed under the buttons.  The Indian Corn is also from the same JustRite set.  It was colored with Copic markers and cut out then attached with glue.

The leaves and acorns, below the sentimen,t were created with the Cheery Lynn Small Leaves #1 (D133), Small Leaves #2 (D134), and Large Leaves #2 (D136).  I love how when you die cut thesem they also have the embossed veins in them.  The acorns and leaves were sponged using small sponge daubers and the acorns were clear embossed.  Everything was arranged on the side of the box then a small bow added to complete the design.

I plan to fill this with chocolates for someone who will be having a birthday soon.

Hope you enjoyed my project day - I sure had a lot of fun creating it.  Remember, you can purchase All these products from Joan's Gardens.

It is a gorgeous Autumn day.  Wishing you a spectacular weekend.

320819

Thursday, September 22, 2011

There's No One Like You

 This is a card I created with some of the new Cheery Lynn dies you can get at Joan's Gardens.  The orange flower was created with the Stacker Flower #6 (SF-6). There are four layers to this flower.  It was shaped with the tools from the Flower Tool Kit.  The stamen was created with the Sky Flake punches - one small black and one medium green.  The pretty oval doily is the Polynesian Sails Oval (DL 153).  For the center of the oval I used the Burble Double Sided Embossing Plate (E164).  After it was embossed, it was cut out with an oval Nestie that is the same size as the center of this oval, then sponged with Distress Ink.  The JustRite sentiment was stamped with black ink then cut out with one of the "Inverted Scalloped Window Stackers".  Three pearls were added under the sentiment.  Below you will see a photo of the gorgeous "Lace Rose and Flourishes" die.  I cut the two flourishes off from the rose and layered them under the flower.  The leaves for the flower were cut using the Stackers #1 (SF-1) which is a three leaves together but very easy to snip apart.  Isn't that a beautiful butterfly!  It is the Small Lace Faerie Queen w/Angel Wing (DL 161).  The lace butterfly was die cut using a light green card stock and the angel wing below it is a darker green.

Don't you love all these new Cheery Lynn Dies!  You can get yours from Joan's Gardens.

 Side View to show you the dimension of the flower.

This is the gorgeous Lace Rose & Flourishes Die.  It is gorgeous cut apart to use on cards and will be gorgeous used on a scrapbook page.

319394

Wednesday, September 21, 2011

Joan's Gardens Weekly Challenge #3 and Card Box Tutorial


Every Thursday it is time for a new weekly challenge at Joan's Gardens.  This week we have something different for you.  Joan has completed the card for the challenge and I have the second half the challenge here, which is to create a box for your card.  You should start at Joan's blog to get all the information.

I have had a lot of people ask me how I mail out my cards since most of them are very dimensional.  I thought I would do a tutorial for you and we would incorporate it into this week's challenge.

I am sending out the above birthday card, which I posted here, and needed a box to put it in.  I think this box would be sturdy enough to use alone to mail off the card, but I put them into a padded envelope because I like to decorate the outside too.

Below are the instructions on how to create a box for your dimensional cards.

My card is 5.5" x 6".  You can use these directions to create a box any size to fit your card.   For the bottom you need a piece of card stock that is one inch wider and longer than your card.  For my card I cut it 6.5 x 7".  It is scored all the way around at 1/2".

This is the outside of the bottom of the box.  You need to cut a slit, up to the score line, on all four corners.  In the picture you will see the score tape on these corners.  Fold in the tabs to create your box bottom.


 For the lid you need to cut it 1/16" of an inch larger than the bottom, on  two opposite sides.  For my card  it is 6.5" PLUS 1/16" and on the other side it is 7 1/16". This extra 1/16" will allow the lid to fit over the bottom to close. You again score it at 1/2" all the way around.  On the front side of your lid, you will again cut up to the score line and attach ScorTape to the tabs to create a box shape, like for the bottom.  Do not do this to the other end.  We are going to attach the back of the lid to the bottom of the box.

 
On the backside of the lid, you want to cut off those two tabs as shown in this picture.  Place the ScorTape along the long edge.  I rounded off those two back corners for a neater appearance.  Place the lid over the bottom of the box.  Pull off the protective covering on the tape and press it to the side of the bottom of the box. You now have a hinged lid on your box.

The box will look like this when opened.  My card fits perfectly inside the box.

To decorate the top of the box, I die cut a doily from the Marianne LR0180 doily set.  There are three doilies in this set plus a corner.  I wanted the box top plain but wanted the doily to standout, so I placed the bottom half of the doily into the Sizzix "Flourish & Dots" (656980) embossing folder so there would be texture on the bottom half.  On the top portion of the doily I used a Heartfelt Creations  birthday stamp then added a bow.

I hope you will join us this week in the challenge at Joan's Gardens.  All the details for the card are on Joan's Blog then you can complete the box for it from this tutorial. There will be a random drawing for a winner from all entries in this challenge and someone will receive a prize.  The winner will also be in the drawing for the $100 gift certificate to Joan's Gardens which will be given away at the end of the year.  Wouldn't you love to win that prize!

318623

Tuesday, September 20, 2011

Pink Poinsettias


I have been busy helping Joan design some new projects for her next workshop and have not posted for a couple of days.   I promised to give you the recipes for some of the Heartfelt Creations cards I created for Joan's Gardens for the new Christmas Cheer Collection, so thought I would start with this one.

I have been wanting a really beautiful poinsettia stamp and was so excited to see that the new Heartfelt Collection "Petite Poinsettia PreCut Set" (HCPC 3415) set has different size poinsettia petals (layers) that can be easily die cut, with the matching Spellbinder Poinsettia die, and layered to create beautiful dimensional poinsettias. You can use the flowers in this set to create your own poinsettia arrangements and/or use them with a lot of the other stamps in the Christmas Cheer Collection.  I know these are stamps you will use year after year.

This is a tri-fold card that will fit into a business size envelope.  The top panel was cut off to show part of the bottom panel and punched with a Martha Stewart border punch.  The panel below was decorated with a piece of design paper from "my" scrap box.  The edges of both the top and lower panel were sponged with pink ink.  On the top flap, the Heartfelt Creations "Poinsettia Border" (1423G) was gold embossed.  The center dimensional poinsettia was created using two of the largest flowers from the "Petite Poinsettia PreCutSet"  and one of the next size down.  The two poinsettias on each side are two of the smallest flowers layered.  These flowers were gold embossed on watercolor paper.  They were colored using watercolors.  The embellishment on the bottom panel is a die cut from the Spellbinders "Twisted Metal Tags and Accents".  To complete the card I glued large gold beads in the center of the flowers and on the accent. 

I had someone ask me which glue I use to attach my flowers.  My favorite glue is Api's "Crafter's Pick".  This is a nice thick glue.  It is the only non-toxic, water-based Super Glue.  It adheres to metals, plastics, glass and more and dries clear.

As you know you can purchase all the products I used from Joan's Gardens.

317982

Saturday, September 17, 2011

Little Box plus a mini tutorial


This is such a cute little box for a small gift.  I plan to fill it with some good chocolates to be included with a birthday gift.  

This is a die cut box.  It is one I received from Joan's Gardens called "Rectangle Box" by Sizzix.  When you die cut it, it cuts a bottom and a separate lid.  Below is a picture of the back of the box to show you how the two pieces are connected. 

 After scoring and taping the bottom, you attach the lid with brads.  I love this look.

 I used a piece of "My Mind's Eye" 12x12", double sided design paper.  It was cut in half to fit right on top of the die.  For the front closure I used an embellishment I received from Joan's Gardens, probably last year.  It says exactly what I wanted it to say.  This person is super happy to receive good chocolate so "Joy" is perfect.


For the top I created a rose with the new Spellbinders "Spiral Blossom One" die.  I thought I would show you a picture of the die cut flower and then explain how I shaped it to make it easier to roll into the spiraled rose.

When you die cut the "Spiral Blossom One" this is what it looks like.  It is perfectly flat and you need to roll it starting from the outside edge, which will become the center of the rose.

You know how I like to make my flowers as realistic as possible, so I use the tools from the Flower Tool Kit, you can get from Joan's Gardens, to condition this strip. I sure do get a lot of use from this Tool Kit! I used the large white tool to "cup" each of the petals, going all the way around the spiral.


By conditioning the card stock with this tool, you can see how it helped to "cup" the petals and it has already started the spiraling process without me trying roll it to get  the flat piece started in the spiral. This process made it very easy to roll it into the flower shape.


But before I actually started rolling the spiral, I turned the spiral over and used the largest stylus tool in the Flower Tool Kit to shape the petals back on the tips.  You just go around in small circles on the very edge of each petal.


The rose was placed on top of Marianne (LR0157) Decorative Elegance die cut and a few Martha Stewart punched branches tucked in around the rose.


Since I used double sided paper, I used the solid portion for the outside bottom of the box and the patterned side for the lid.  This is reversed on the inside which gives it a nice completed look.

You can order the Sizzix Box Die and the Spellbinder Spiral Blossom One die from Joan's Gardens.  This little box really was easy to put together and I think you will love working with it.  I hope you enjoy the mini tutorial on how I created the rose.
The weather has really cooled down here in Washington but I guess it is about time for Autumn to arrive.  Have a wonderful weekend.


316046

And the Winner Is . . .

Blogger First I want to congratulate Carole who won last week's challenge at Joan's Gardens.  She will be receiving a gift from Joan plus be entered into the drawing for the $100 gift certificate to Joan's Gardens which will be given away at the end of the year. 

In addition to that winner, Joan kicked the new season of challenges off by giving away two more gifts.  The winners were randomly selected from one person commenting on Joan's Blog and one from my blog.  You can read the details over at Joan's Gardens
 
The winner from my blog is #39.  Below are her comments:

Sherry Kushibab said...
I do not own and would like to own the 'Flourishes Dot ands and Ribbons', EF's are so fun to work with and addd such a wonderful touch. Love following your blog you do such beautiful work, always an inspiration.

Congratulations Sherry.  Please contact Joan with your information.


Friday, September 16, 2011

New Flower Stackers from Joan's Gardens


 Today I worked with some of the new Cheery Lynn Dies I received from Joan's Gardens.  I really love these new Stacker Flowers.  The flowers on this card were created with the "Stacker Flower #4" (SF-4) die.  There are two layers for each flower.  For the stamens I used two different punches:  Small Frilly Snowflake and Medium Sparkle.  The design paper is from the new Webster's Pages "Your Beautiful Life" paper pad. This pad has some purple papers in it which are hard to find - I am always on the lookout for pretty purple design paper. The beautiful oval doily is the Polynesian Sails Oval (DL153).  It was attached on the top of the card which is 6" x 5 1/2".  For added beauty, I add the Cheery Lynn "Victorian Romance Flourish" attaching the center of it to the bottom center of the oval doily.  It almost looks like "feet" to hold up the oval frame. Tucked in behind the flowers are leaves from the Cheery Lynn "Stacker Flower #1" (SF-1) and a few Martha Stewart punched branches.  The Sentiment is from the JustRite "Elegant Frames" stamp set.  The two flourishes up in the corners are from the Marianne (LR0117) die set.  This set also has a pretty rectangle doily.  Everything was arranged on the card then a silk purple bow was added. Black pearls were added to the center of the flowers, under the sentiment and up in the corners.


 This view of the card shows the dimension of the flowers.

This is something else I was working on today.  Joan has some new videos on her blog I'm sure you will want to see.  One of the videos shows how to create crape paper flowers.  I will be making a card with these flowers later.  They are so easy to create using these special Cheery Lynn Scalloped Window Stackers (XMC-5).  There are six different sizes in each set, which allows you to create different sizes and styles of flowers.  I have some techniques, not shown in the video, I will share with you when I post my card using these flowers.  There are also "Inverted Scalloped Window Stackers (XMC-6) and "Classic Window Stackers (XMC-4).  I am anxious to see what other pretty flowers I can create with all these dies.

As you know, you can purchase all the products I use from Joan's Gardens.  Don't forget to go over to Joan's blog and view the four new Cheery Lynn Videos for lots of ideas.

315193

Thursday, September 15, 2011

Joan's Gardens Weekly Challenge #2

 It is time for another weekly challenge at Joan's Gardens.  Last week you enjoyed creating a background with two different embossing folders.  This week we would like to have you make a card creating your background with another technique using an embossing folder - there are pictures below to explain the technique.

The embossing folder I used is the Sizzix "Holly Swirls" (657139).  Using the technique below, I patted Memento "Dessert Sand" on the Inside of the embossing folder on the soild side; the part of the folder that will be the background - in this case the holly leaves are the embossed portion so the other side was inked.  You can't see it very easily in this photo, but it has a pretty tan background.  Because it doesn't show very well, I have used green for the sample below.

The design paper used is from the Graphic 45 "Christmas Emporium Collection.  To give it "interest" I used a piece with the stripped paper going vertical on the left side and used it the opposite way on the right side.  The embossed background was backed with black card stock and then attached in the center.

The poinsettias and sentiment are from the new Heartfelt Creations "Holiday Poinsettia Candle Precut Set" (HCPC 3419).  The flowers are at the base of the candle.  They were stamped several times so they could be cut out and made dimensional.  They were colored with watercolors.  Small yellow beads were glued in the center and glitter added to the petals.  The sentiment was gold embossed on black card stock and cut out with a Spellbinders Labels Seventeen.  It was tucked behind the poinsettias.  To complete the card, two Spellbinders corners (Parisian Accents) were die cut and added to the top corners.


 This photo shows how the background portion of the embossing folder was inked.  You can either pat the ink onto the folder or use a brayer to add the ink.

When it comes out you will have ink in the background with the embossed area remaining the same color as the card stock used.  I have found that each time you do this, the results will be different.  Personally I prefer lighter shades of ink for the background for just a "hint" of color.  Lets see what you create doing this technique.

Here is the challenge for this week:
  • Create a Christmas card
  • Create an embossed background using the technique above
  • Use stripped design paper
  • Gold emboss your sentiment
Be sure to go over to Joan's Gardens to get all the details about this week's challenge.  We always look forward to seeing your beautiful projects.  Remember someone will win a prize plus be entered into the drawing for the $100 gift certificate that will be given away at the end of the year.

314269

LinkWithin

Related Posts with Thumbnails